Oven-Baked Nachos
Picture this: it’s game day, and you’re craving something cheesy, crunchy, and utterly satisfying without the hassle of frying up a storm in the kitchen. That’s where oven-baked nachos come in – my go-to for effortless crowd-pleasing snacks. I’ve made these oven-baked nachos countless times for family gatherings, and they never fail to disappear in minutes. The magic? Everything gets layered and baked to perfection, melting the cheese just right over sturdy tortilla chips loaded with your favorite toppings.
In my experience, traditional nachos can get soggy if not handled carefully, but baking them in the oven keeps everything crisp and flavorful. Whether you’re a nacho novice or a seasoned pro, this recipe for oven-baked nachos will elevate your snacking game. Let’s be honest, who doesn’t love a dish that’s ready in under 30 minutes? I’m excited to share this easy oven-baked nachos recipe with you – it’s simple, delicious, and perfect for any occasion.
Key Takeaways:
- Oven-baked nachos are a quick, mess-free alternative to stovetop versions, ready in about 20 minutes.
- They save time by layering toppings directly on a baking sheet for even melting.
- The flavors burst with melted cheese, seasoned beef, and fresh add-ons for ultimate taste.
- Use sturdy chips and fresh cheese for the crispiest oven-baked nachos every time.
- Store leftovers in the fridge for up to 2 days and reheat in the oven to maintain crunch.
Why You’ll Adore This Oven-Baked Nachos
Effortless Preparation: No deep frying or constant stirring – just assemble and bake your oven-baked nachos. In my kitchen, this means more time enjoying the company and less cleanup. It’s a game-changer for busy weeknights or parties.
Grab This Chef Knife Now - Almost Gone!

- Stays Razor-Sharp: Ice-hardened blade keeps its edge longer than ordinary knives
- Superior Grip Control: Unique finger hole design gives you perfect balance and safety
- Built to Last a Lifetime: Premium stainless steel blade with elegant beech wood handle
- ✓ Finally, a knife that stays sharp and feels comfortable in my hand
- ✓ Professional quality without the premium price tag
- ✓ Makes meal prep faster and more enjoyable
⏰ Only a few items left in stock - order soon
Customizable Toppings: Load up with whatever you have on hand, from spicy jalapeños to creamy avocado. I love how versatile oven-baked nachos are; they adapt to your mood or dietary needs effortlessly. You’ll find yourself experimenting every time.
Perfect Crunch and Melt: The oven ensures chips stay crispy while cheese oozes invitingly over the oven-baked nachos. What I find interesting is how the heat brings out the flavors without sogginess. It’s that ideal texture contrast we all crave.
Family Favorite: Kids and adults alike dig in without hesitation. Here’s the thing: these oven-baked nachos bring everyone to the table with their irresistible aroma. Share the joy of a homemade treat that feels indulgent yet simple.
Essential Ingredients for Oven-Baked Nachos
Tortilla Chips: Opt for sturdy, restaurant-style chips that won’t crumble under the weight of toppings. They form the crunchy base of your oven-baked nachos, absorbing just enough cheese without getting soggy. In my experience, thicker chips hold up best during baking, ensuring every bite is satisfying. Freshness matters here – stale chips can ruin the texture.
Shredded Cheddar Cheese: A blend of sharp cheddar and Monterey Jack gives that classic melty pull. This cheese melts beautifully in the oven, creating gooey layers over your oven-baked nachos. I always grate my own for better melting; pre-shredded often has additives that affect creaminess. It’s the star that ties all flavors together.
Ground Beef: Seasoned with taco spices, it adds hearty protein and savory depth to oven-baked nachos. Cook it with onions and garlic for extra flavor infusion. This ingredient makes the dish filling enough for a meal, not just an appetizer. Lean beef keeps it lighter without sacrificing taste.
How to Make Oven-Baked Nachos
Prep Your Toppings
Start by cooking the ground beef in a skillet over medium heat until browned, about 5-7 minutes, draining excess fat. Stir in taco seasoning, a splash of water, and let it simmer for a couple of minutes to build flavor. Meanwhile, chop tomatoes, onions, and jalapeños for fresh contrast. This step sets the stage for your oven-baked nachos, ensuring toppings are ready when assembly time hits. In my experience, prepping everything first keeps the process smooth and stress-free.
Layer and Assemble
Spread a single layer of tortilla chips on a large baking sheet lined with parchment for easy cleanup. Sprinkle half the cheese evenly, then add the seasoned beef, beans if using, and scatter veggies on top. Repeat with another layer of chips, cheese, and toppings for even distribution. The key here is not overcrowding – you want space for heat to circulate. Now, you’re building the heart of these oven-baked nachos, where flavors will meld beautifully.
Bake to Perfection
Preheat your oven to 400°F and slide the baking sheet inside for 8-10 minutes, until cheese is bubbly and golden. Watch closely to avoid burning the edges; the aroma will signal when your oven-baked nachos are done. Remove and let cool for a minute before adding cold toppings like sour cream and cilantro. This resting time helps the cheese set slightly, making serving easier. Serve hot for that ultimate crunch – trust me, it’s worth the wait.
Ingredients
- 1 bag (12 oz) sturdy tortilla chips
- 2 cups shredded cheddar cheese
- 1 lb ground beef
- 1 packet taco seasoning
- 1 can (15 oz) black beans, drained
- 1 cup diced tomatoes
- 1/2 cup diced red onion
- 1/4 cup sliced jalapeños (optional)
- 1/2 cup sour cream
- 1/4 cup chopped cilantro
- Salt and pepper to taste
- Optional: Guacamole or salsa for serving
Oven-Baked Nachos Instructions
- Brown the ground beef in a skillet over medium heat for 5-7 minutes, drain fat, and mix in taco seasoning with 1/4 cup water. Simmer until thickened.
- Preheat oven to 400°F. Layer chips on a baking sheet, top with half the cheese, beef, beans, tomatoes, onion, and jalapeños. Repeat layers.
- Bake for 8-10 minutes until cheese melts and bubbles. Remove, add sour cream and cilantro, and serve immediately.
Pro Tips for the Best Oven-Baked Nachos
Use Parchment Paper: Line your baking sheet to prevent sticking and make cleanup a breeze – no scrubbing required.
Cheese in Layers: Distribute cheese between layers to ensure even melting and full coverage on every chip.
Fresh Toppings Last: Add cold items like sour cream after baking to keep them cool and crunchy against the hot oven-baked nachos.
Grab This Kitchen Scale Now — Best Precision Pick!

- Razor-Accurate Every Time: Dual-increment precision down to 0.1g — perfect for baking, meal prep, and portion control with g, oz, ml, and fl'oz modes.
- Smart Removable Bowl Design: Detachable bowl doubles as a protective case for compact storage. Tare function lets you weigh ingredients in any container with zero fuss.
- Built for Everyday Convenience: Auto-zero, tare function, low battery alert, overload indicator, and 2-minute auto-off to extend battery life — all in a sleek stainless steel build.
- ✓ "Perfect for baking — precise, lightweight, and stores easily without wasting counter space"
- ✓ "A game changer! Weighing ingredients is now way more accurate than measuring cups"
- ✓ "Love the 0.1g precision and backlight — best food scale I've owned. Highly recommend!"
⏰ Only a few items left in stock - order soon
You Must Know
- Oven-baked nachos are best enjoyed fresh from the oven for maximum crispiness.
- Adjust spice levels with jalapeños or hot sauce to suit your heat preference.
- This recipe serves 4-6 as an appetizer or 2-3 as a main dish.
- Vegetarian version: Swap beef for more beans or plant-based crumbles.
How to Store Oven-Baked Nachos
To store your oven-baked nachos, let them cool completely before transferring to an airtight container; they keep in the fridge for up to 2 days. Avoid stacking if possible to maintain some crunch, though reheating will revive most texture. For reheating, pop them back in a 350°F oven for 5-7 minutes until warm and cheesy again – microwave works but can soften the chips.
Customizing Your Oven-Baked Nachos
Feel free to swap ground beef for shredded chicken or go meat-free with extra beans for your oven-baked nachos. If you’re watching carbs, try baked tortilla chips or even veggie slices as the base. Add pineapple for a sweet twist or olives for Mediterranean flair – the possibilities are endless. In my experience, tasting as you go helps perfect the balance. For a healthier spin, check out our chicken and cauliflower rice bowls recipe for low-carb inspiration.
What to Serve with Oven-Baked Nachos
Pair your oven-baked nachos with a fresh side salad of greens, avocado, and lime dressing to cut through the richness. For drinks, margaritas or cold beer complement the flavors perfectly. If making it a meal, add cheesy ground beef pasta skillet elements or serve alongside guacamole and salsa. Dips like queso or refried beans round it out nicely for parties.
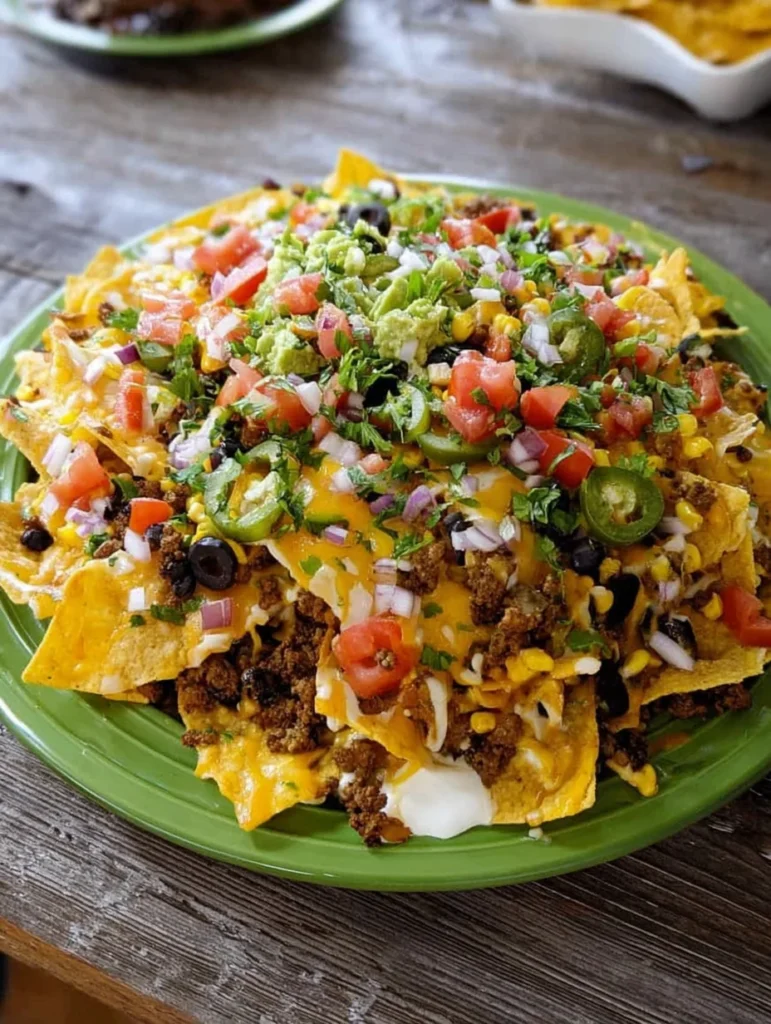
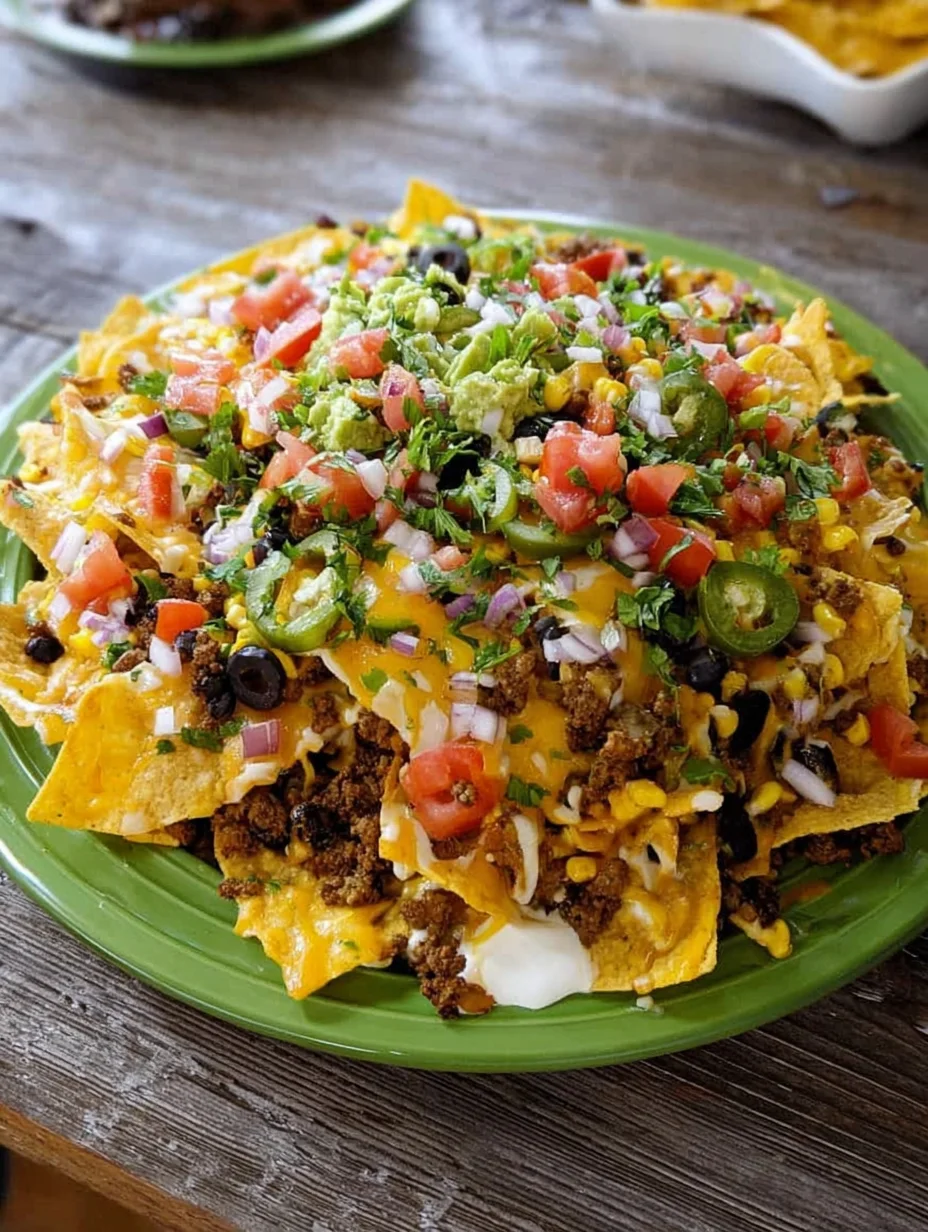
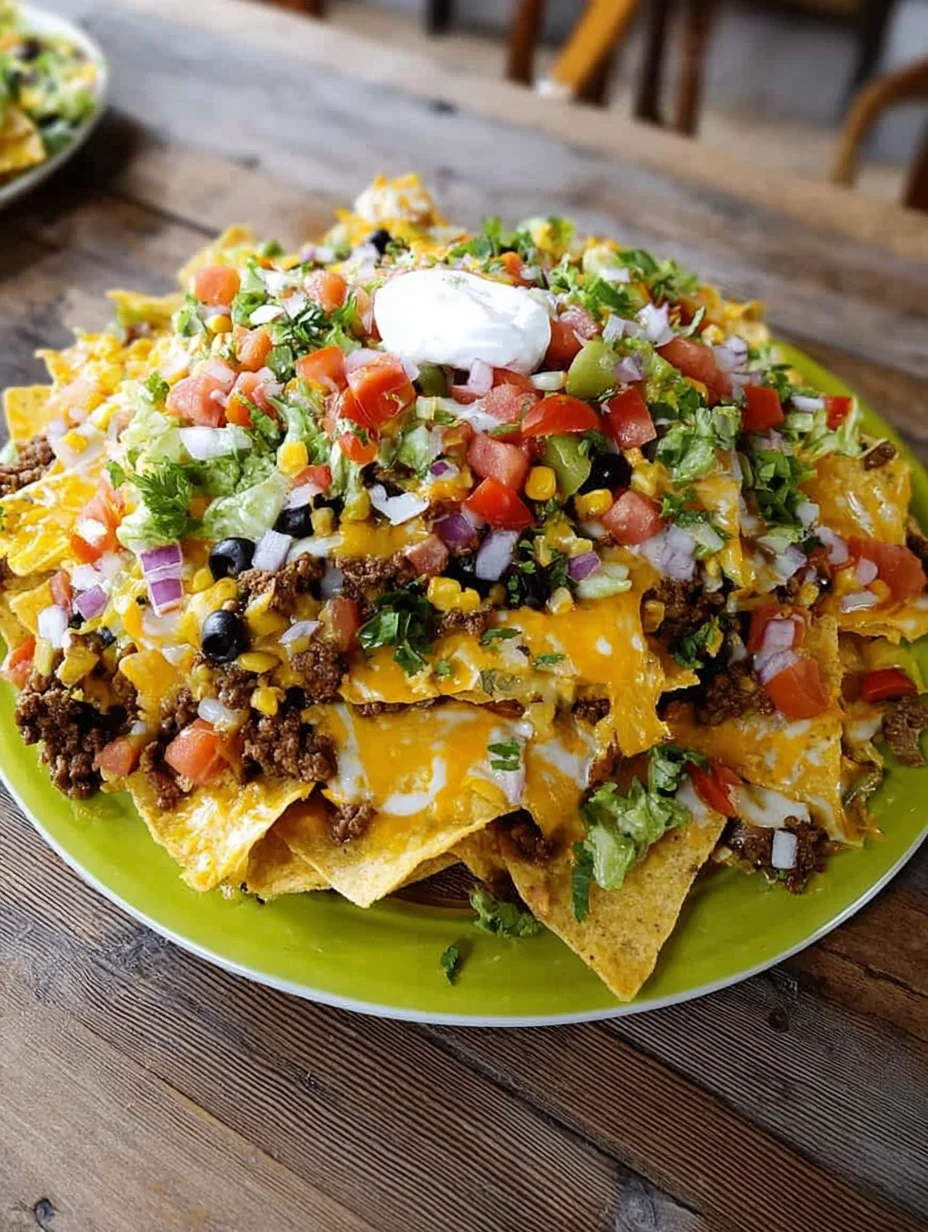
Oven-Baked Nachos
Tortilla chips loaded with seasoned beef, diced veggies, avocado, cheddar and Monterey Jack cheese plus a drizzle of tangy lime sour cream...
Timing
Recipe Details
Ingredients
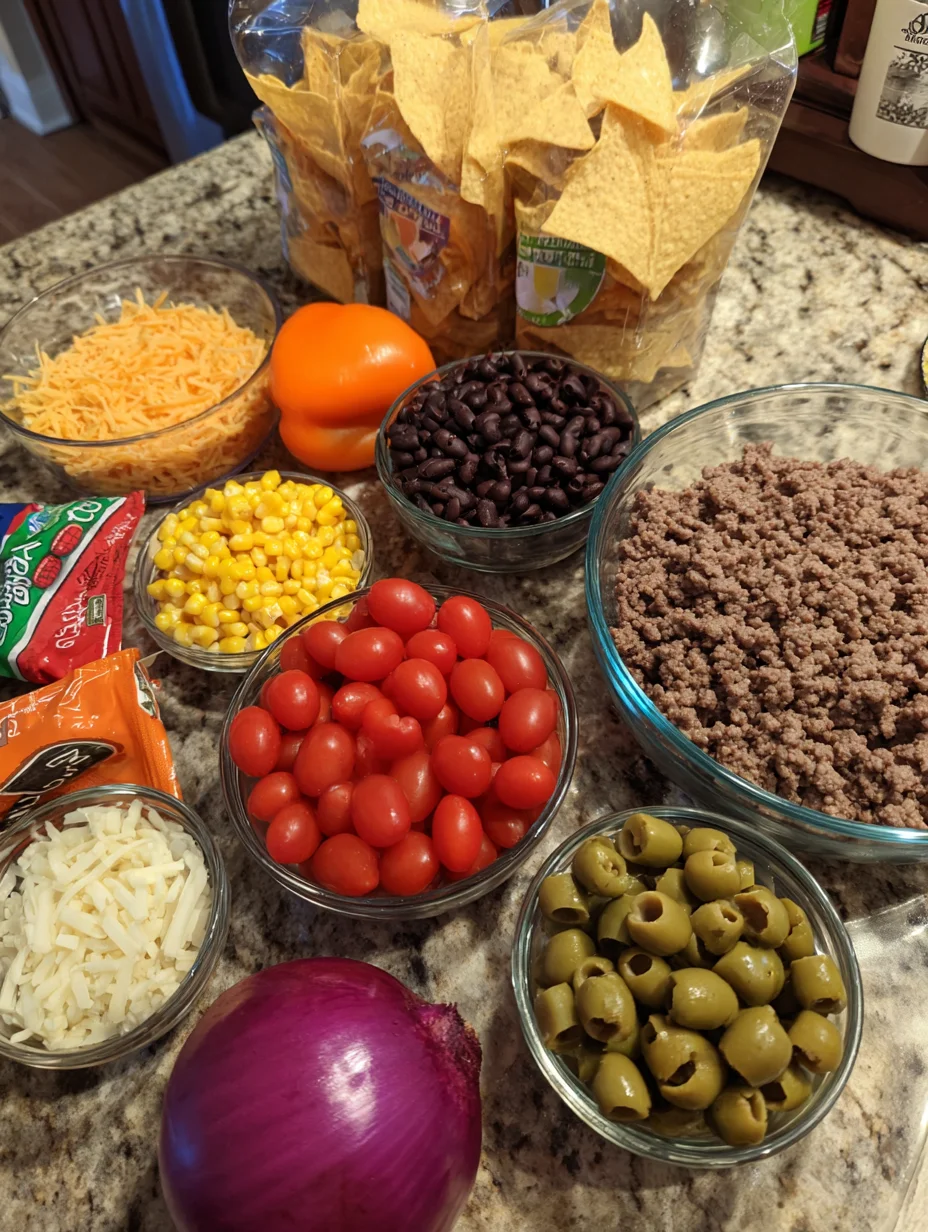
- 01 large bags (13oz) tortilla chips
- 02 1 lb lean ground beef
- 03 tablespoons taco seasoning
- 04 1 can black beans (drained)
- 05 1 orange pepper (diced)
- 06 1 small red onion (diced)
- 07 1 cup cherry tomatoes (sliced)
- 08 corn (kernels from 2 ears)
- 09 1 can black olives (sliced)
- 10 1 can green olives (sliced)
- 11 scallions (chopped)
- 12 jalapeños (thinly sliced)
- 13 cups Monterey Jack cheese
- 14 cups cheddar cheese
- 15 1 cup sour cream
- 16 lime juice (from 2 limes)
- 17 1 teaspoon kosher salt
- 18 1 avocado (chopped)
- 19 tablespoons cilantro (chopped)
Instructions
Preheat oven to 350°F.
Place sour cream, lime juice and salt in a small bowl. Stir together before transferring into a squeeze bottle. Refrigerate until use.
Place a medium-sized skillet on stovetop on medium-high heat. Add the beef, breaking it up as it cooks. When the beef loses its pink colour, stir in the taco seasoning and cook for an additional minute. Transfer to a paper towel-lined strainer to remove excess fat.
To create a collar around the inside of a 10-inch spring-form pan, cut a length of parchment paper that wraps right around the inside and rises two inches above the top. Sprinkle a handful of the chips into the pan, spreading them out evenly. Add a handful of meat, followed by a small handful of the vegetables. End by sprinkling with 1 cup of the Monterey Jack cheese. Repeat this process three more times, alternating which cheese you use. Crush any remaining chips and sprinkle on the top, along with any remaining meat and veggies.
Transfer to oven and bake for 30 minutes or until the cheese is melted. Remove pan from oven placing it onto a large round plate. Using oven mitts, carefully pop the springform and gently lift the ring up and away from the nachos. Peel away and discard the parchment paper. Squeeze the sour cream back and forth across the top along with a sprinkle of avocado and cilantro. Serve immediately.
FILED UNDER:
NUTRITION FACTS (PER SERVING)
Nutrition information is calculated using an ingredient database and should be considered an estimate. In cases where multiple ingredient alternatives are given, the first listed is calculated for nutrition. Garnishes and optional ingredients are not included.
Frequently Asked Questions About Oven-Baked Nachos
Can I make Oven-Baked Nachos ahead of time?
Yes, assemble the layers up to 4 hours in advance and refrigerate, then bake when ready. This saves time for gatherings without sacrificing freshness. Just add cold toppings post-bake.
How long does Oven-Baked Nachos last in the fridge?
Stored properly in an airtight container, oven-baked nachos keep for 1-2 days. Beyond that, the chips may soften. Reheat in the oven for best results.
Are oven-baked nachos healthier than fried?
Absolutely – baking reduces oil use, making oven-baked nachos lighter while keeping the crunch. It’s a smarter choice without losing flavor. Opt for baked chips to amp up the health factor.
Can I use different cheeses in oven-baked nachos?
Definitely; mix mozzarella for stretchiness or pepper jack for heat in your oven-baked nachos. Experiment to find your favorite blend. Freshly shredded always melts better.
What if I don’t have a baking sheet?
Use an oven-safe dish or cast-iron skillet instead – it works just as well for oven-baked nachos. Ensure it’s large enough for even layers. No big adjustments needed.
Can oven-baked nachos be made vegetarian?
Yes, skip the meat and load up on beans, corn, and veggies for delicious oven-baked nachos. It’s protein-packed and just as satisfying. Try our broccoli pasta recipe for more veggie ideas.
How do I make oven-baked nachos spicier?
Add more jalapeños, chipotle seasoning, or hot sauce to the beef layer. Taste the toppings before baking. It amps up the excitement without overpowering.
Can I freeze oven-baked nachos?
It’s not ideal as freezing softens chips, but you can freeze assembled unbaked versions for up to a month. Bake from frozen, adding 5 extra minutes. For best texture, make fresh oven-baked nachos.
Final Thoughts
From the first melty bite to the last crunchy chip, these oven-baked nachos deliver comfort and excitement in every layer. I’ve shared how easy they are to whip up, customize, and love – now it’s your turn to try them. Whip up a batch this weekend and see why they’re a staple in my home; your taste buds will thank you!