Fried Chicken Breast Recipe

There’s something truly magical about biting into a piece of perfectly Fried Chicken Breast—crispy on the outside, juicy and tender on the inside. I remember the first time I tried making Fried Chicken Breast at home; it was a game-changer from those store-bought versions that always fell flat. In my experience, nothing beats the homemade Fried Chicken Breast for a comforting family dinner or a casual weeknight meal. I’ve tweaked this recipe over the years to get that ideal crunch without all the fuss.
What I love most about this Fried Chicken Breast is how versatile it is—you can serve it with your favorite sides or even slice it up for salads. Let’s be honest, who doesn’t crave that golden, flavorful crust? Today, I’m sharing my go-to method for Fried Chicken Breast that’s easy enough for beginners but delivers restaurant-quality results every time. Get ready to impress yourself and your loved ones with this delicious Fried Chicken Breast!
Key Takeaways:
- This Fried Chicken Breast recipe delivers crispy, golden perfection with minimal effort, perfect for busy weeknights.
- Prep and cook in under 30 minutes for a quick, satisfying meal that saves you time in the kitchen.
- Bursting with savory flavors from simple seasonings, ensuring every bite of Fried Chicken Breast is mouthwatering.
- Pat the chicken dry before dredging for the crispiest coating on your Fried Chicken Breast.
- Store leftovers in an airtight container for up to 3 days; reheat in the oven to maintain crispiness.
Why You’ll Adore This Fried Chicken Breast
Crispy Exterior, Juicy Interior: Nothing beats the satisfying crunch of this Fried Chicken Breast followed by that tender, flavorful bite. In my kitchen trials, getting this balance right makes all the difference—it’s like a hug from your favorite comfort food. You’ll find yourself coming back for seconds every time.
Grab This Chef Knife Now - Almost Gone!

- Stays Razor-Sharp: Ice-hardened blade keeps its edge longer than ordinary knives
- Superior Grip Control: Unique finger hole design gives you perfect balance and safety
- Built to Last a Lifetime: Premium stainless steel blade with elegant beech wood handle
- ✓ Finally, a knife that stays sharp and feels comfortable in my hand
- ✓ Professional quality without the premium price tag
- ✓ Makes meal prep faster and more enjoyable
⏰ Only a few items left in stock - order soon
Simple Ingredients, Big Flavor: We keep things straightforward with pantry staples, yet the result is a Fried Chicken Breast packed with taste. I’ve always believed that the best recipes don’t need fancy add-ins; it’s the technique that shines here. Your taste buds will thank you for this easy upgrade to ordinary chicken.
Versatile for Any Meal: Whether it’s lunch, dinner, or even a snack, this Fried Chicken Breast fits seamlessly into your day. Pair it with veggies or tuck it into a sandwich— the possibilities are endless, and that’s what makes it so appealing in my book.
Family-Friendly and Forgiving: Even if you’re new to frying, this Fried Chicken Breast turns out great without much stress. I love how it brings everyone to the table with its irresistible aroma. It’s the kind of dish that creates happy memories around the dinner table.
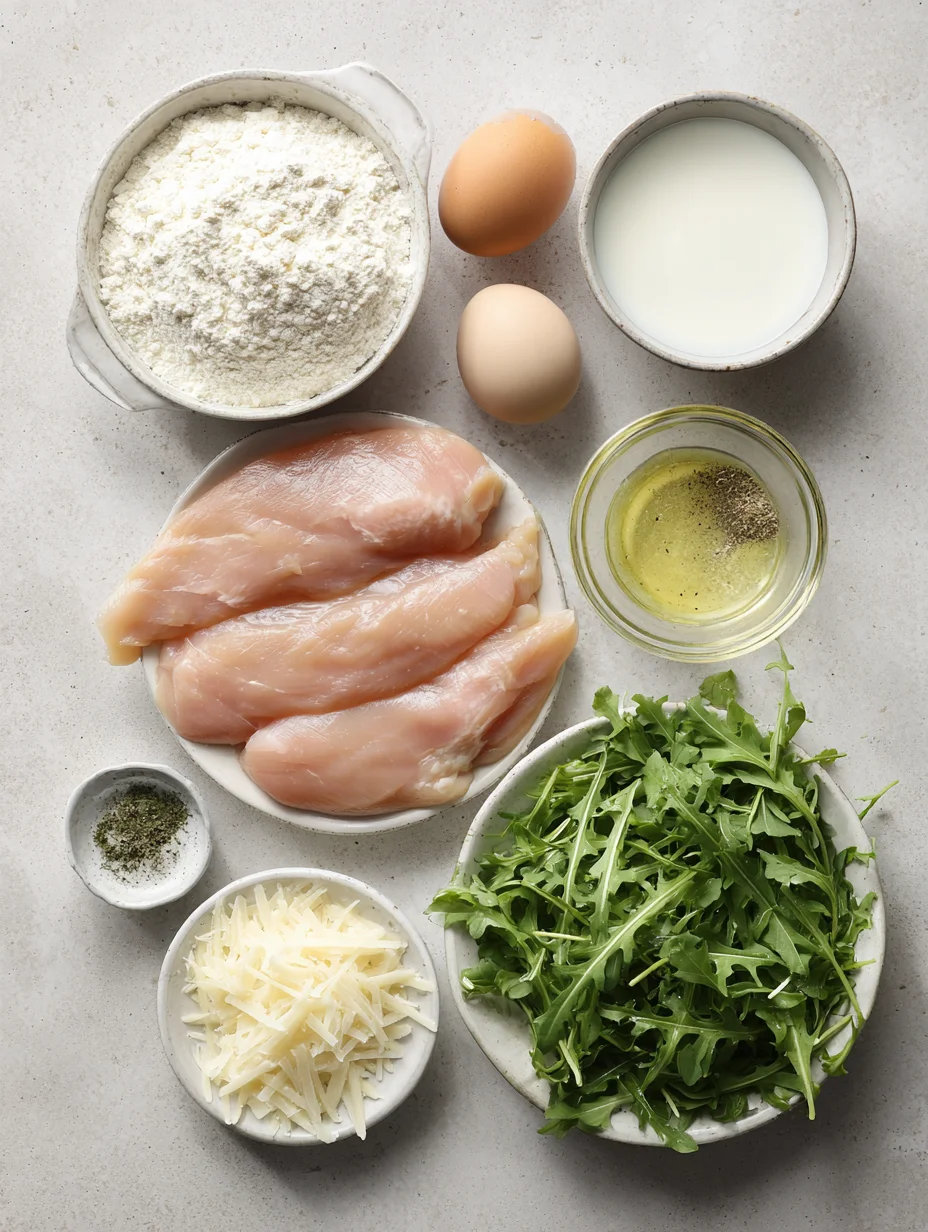
Essential Ingredients for Fried Chicken Breast
Boneless Chicken Breasts: These are the star of your Fried Chicken Breast, providing a lean yet flavorful base that’s quick to cook through. I always choose fresh, plump ones for the best texture—avoid anything too thin to prevent drying out. Seasoned lightly, they absorb all the coating flavors beautifully, resulting in that juicy center we crave. In my experience, about 1-1.5 pounds serves four generously.
All-Purpose Flour: This forms the base of the dredging station, creating a light crust for your Fried Chicken Breast. Mixed with spices, it adds subtle savoriness without overpowering the chicken. I’ve found that sifting it helps avoid clumps, ensuring an even coat every time. It’s a simple ingredient that punches up the overall crispiness.
Eggs: Beaten eggs act as the binder in making Fried Chicken Breast, helping the breadcrumbs adhere perfectly. They add richness and moisture, locking in the chicken’s juices during frying. For this recipe, two large eggs do the trick, whisked with a splash of milk for extra smoothness. This step is crucial for that restaurant-style hold on the coating.
How to Make Fried Chicken Breast
Prepare the Chicken
Start by patting your chicken breasts dry with paper towels—this is key for crispy Fried Chicken Breast that doesn’t steam instead of fry. Season both sides generously with salt, pepper, and a dash of paprika for that extra kick. In my experience, letting them sit for 10 minutes allows the flavors to seep in nicely. Slice thicker pieces in half horizontally if needed to ensure even cooking.
Set Up the Dredging Station
Now, grab three shallow bowls: one for flour mixed with garlic powder and onion powder, another for the beaten eggs with a pinch of salt, and the last for seasoned breadcrumbs or panko for ultimate crunch. Dip each piece of chicken first in flour, shaking off excess, then into the egg, and finally coat thoroughly in breadcrumbs. Press gently to adhere—I’ve noticed this double-check prevents bare spots on your Fried Chicken Breast. Let them rest on a wire rack for a few minutes while you heat the oil.
Fry to Golden Perfection
Heat about 1/2 inch of vegetable oil in a large skillet over medium-high heat until it shimmers, around 350°F if you have a thermometer. Carefully add the breaded chicken in batches, frying for 5-7 minutes per side until deeply golden and the internal temperature hits 165°F. The sizzle and aroma will fill your kitchen, signaling delicious Fried Chicken Breast is almost ready. Drain on paper towels to keep that crispiness intact.
Ingredients
- 4 boneless, skinless chicken breasts (about 1.5 lbs)
- 1 cup all-purpose flour
- 2 large eggs, beaten
- 1 cup breadcrumbs or panko
- 1 tsp salt
- 1/2 tsp black pepper
- 1 tsp paprika
- 1/2 tsp garlic powder
- 1/2 tsp onion powder
- Vegetable oil for frying
Fried Chicken Breast Instructions
- Pat chicken breasts dry and season with salt, pepper, and paprika. Let sit for 10 minutes.
- Set up dredging station: flour with spices in one bowl, beaten eggs in another, breadcrumbs in the third.
- Dip chicken in flour, then egg, then breadcrumbs. Press to adhere and rest on a rack.
- Heat oil in skillet to 350°F. Fry chicken 5-7 minutes per side until golden and 165°F internal.
- Drain on paper towels. Serve hot with your favorite sides.
Pro Tips for the Best Fried Chicken Breast
Don’t Skip the Rest: After breading, let your Fried Chicken Breast sit for 5-10 minutes; this helps the coating stick and stay crispy during frying.
Oil Temperature Matters: Use a thermometer to maintain 350°F—too low and it’s greasy, too high and it burns. This ensures perfect Fried Chicken Breast every time.
Add Heat if You Dare: Mix in cayenne to the flour for a spicy twist on Fried Chicken Breast without much extra work.
Grab This Kitchen Scale Now — Best Precision Pick!

- Razor-Accurate Every Time: Dual-increment precision down to 0.1g — perfect for baking, meal prep, and portion control with g, oz, ml, and fl'oz modes.
- Smart Removable Bowl Design: Detachable bowl doubles as a protective case for compact storage. Tare function lets you weigh ingredients in any container with zero fuss.
- Built for Everyday Convenience: Auto-zero, tare function, low battery alert, overload indicator, and 2-minute auto-off to extend battery life — all in a sleek stainless steel build.
- ✓ "Perfect for baking — precise, lightweight, and stores easily without wasting counter space"
- ✓ "A game changer! Weighing ingredients is now way more accurate than measuring cups"
- ✓ "Love the 0.1g precision and backlight — best food scale I've owned. Highly recommend!"
⏰ Only a few items left in stock - order soon
You Must Know
- Fried Chicken Breast is best enjoyed fresh, but it reheats well in a 375°F oven for 10 minutes to restore crispiness.
- Always check the internal temperature to 165°F for safety—don’t rely on color alone.
- This recipe works with thighs too, but adjust frying time as they are thicker.
- Use neutral oil like canola to avoid overpowering flavors in your Fried Chicken Breast.
How to Store Fried Chicken Breast
To keep your Fried Chicken Breast tasting great, store leftovers in an airtight container in the fridge for up to 3 days. For longer storage, freeze it in a single layer on a baking sheet first, then transfer to a freezer bag for up to 2 months. Reheat in the oven at 350°F for 10-15 minutes rather than microwaving to avoid sogginess—I’ve found this method keeps the Fried Chicken Breast just as crispy as day one.
Customizing Your Fried Chicken Breast
Feel free to swap breadcrumbs for crushed cornflakes for extra crunch in your Fried Chicken Breast, or go gluten-free with almond flour. If you’re watching calories, bake the breaded pieces at 425°F for 20 minutes instead of frying—still delicious! For an Asian twist, add soy sauce to the egg wash. Check out our chicken marinade recipes for more ideas to elevate this Fried Chicken Breast.
What to Serve with Fried Chicken Breast
Pair your Fried Chicken Breast with classic mashed potatoes and gravy for ultimate comfort, or keep it light with a fresh coleslaw and corn on the cob. A simple green salad adds crunch and balance to the richness. Don’t forget biscuits or cornbread to soak up any juices, and a cold iced tea or lemonade cuts through the savoriness perfectly.
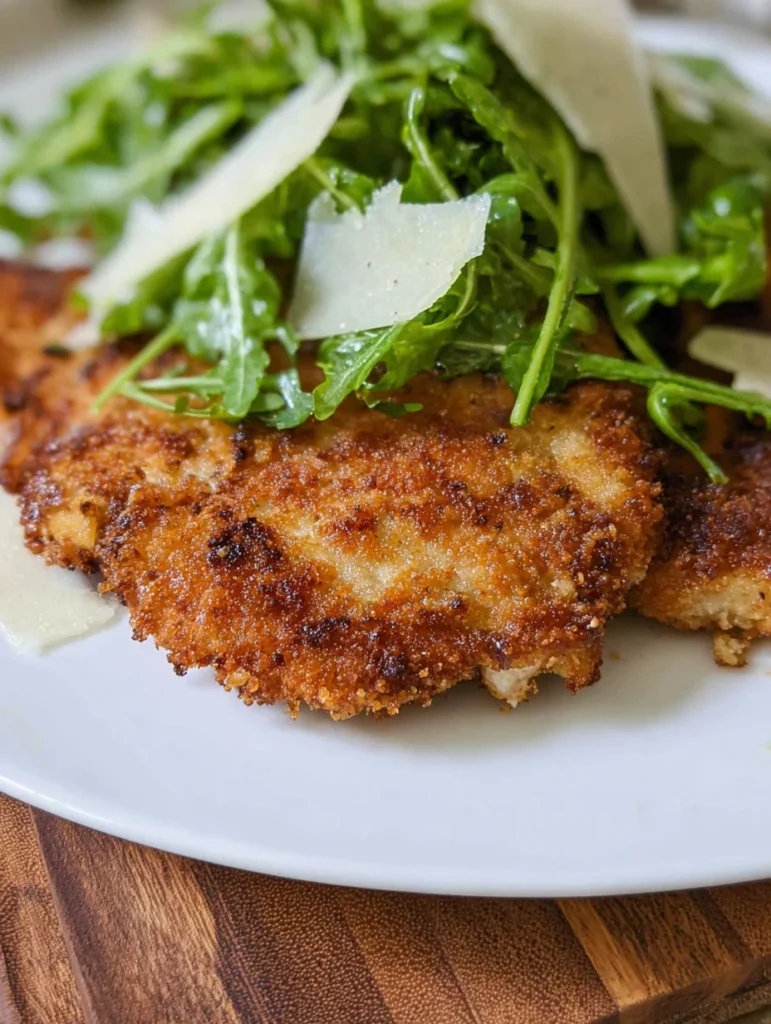
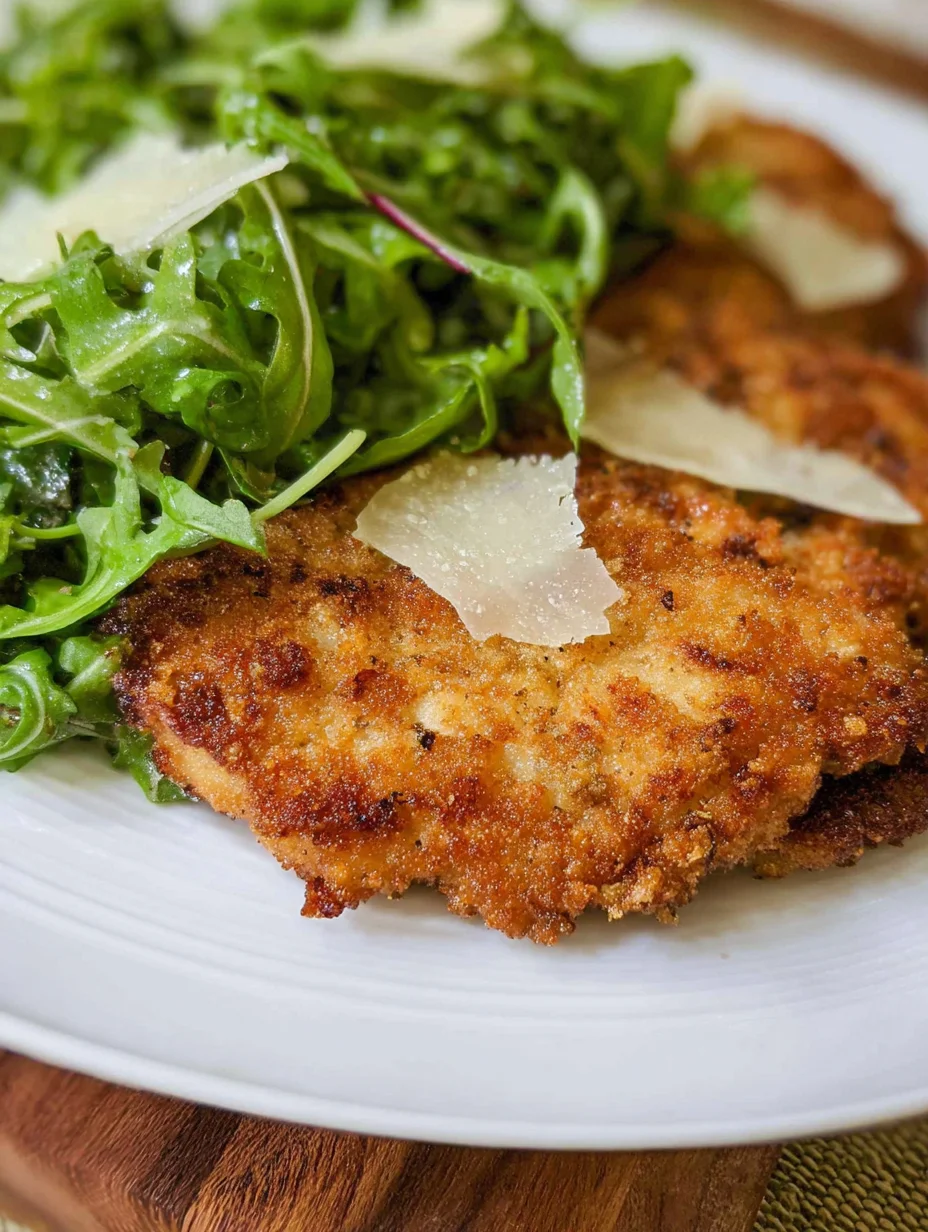
Fried Chicken Breast Recipe
This crispy fried chicken breast recipe is topped with arugula, shaved parmesan cheese, and a delicious lemon vinaigrette!
Timing
Recipe Details
Ingredients
- 01 4 thin chicken breasts
- 02 1 pint buttermilk
- 03 ¾ cup all-purpose flour
- 04 ¾ cup panko bread crumbs
- 05 1 egg
- 06 2 teaspoons salt
- 07 1 teaspoon garlic powder
- 08 1 teaspoon pepper
- 09 4 cups baby arugula ((loosely packed))
- 10 4 tablespoons shaved parmesan cheese
- 11 2 tablespoons olive oil
- 12 2 tablespoons butter
- 13 2 tablespoons lemon juice
- 14 ¼ cup olive oil
- 15 salt and pepper (to taste)
FILED UNDER:
NUTRITION FACTS (PER SERVING)
Nutrition information is calculated using an ingredient database and should be considered an estimate. In cases where multiple ingredient alternatives are given, the first listed is calculated for nutrition. Garnishes and optional ingredients are not included.
Frequently Asked Questions About Fried Chicken Breast
Can I make Fried Chicken Breast ahead of time?
Yes, you can bread the chicken up to 4 hours ahead and keep it in the fridge on a rack. Fry just before serving for the best texture on your Fried Chicken Breast. If pre-frying, reheat in the oven as mentioned earlier.
How long does Fried Chicken Breast last in the fridge?
Your Fried Chicken Breast will stay fresh for 3-4 days when stored properly in the fridge. Beyond that, freeze it to extend enjoyment. Always reheat to 165°F for safety.
Is Fried Chicken Breast healthy?
While indulgent, using lean breasts and minimal oil makes this Fried Chicken Breast a balanced choice. Bake it for a lighter version without sacrificing flavor. Pair with veggies for a nutritious meal.
What’s the best oil for frying Fried Chicken Breast?
Vegetable or canola oil works best for Fried Chicken Breast due to their high smoke points. Avoid olive oil as it can impart a bitter taste at high heat. Aim for neutral flavors to let the chicken shine.
Can I air fry Fried Chicken Breast instead?
Absolutely, spray the breaded chicken with oil and air fry at 375°F for 15-20 minutes, flipping halfway. This cuts down on oil while keeping your Fried Chicken Breast crispy—try our air fryer chicken breast recipe for tips.
How do I know when Fried Chicken Breast is done?
Use a meat thermometer to check for 165°F in the thickest part of the Fried Chicken Breast. It should be golden brown outside with clear juices. Cutting into one briefly confirms doneness without drying it out.
Can I use bone-in chicken for this Fried Chicken Breast recipe?
Bone-in works, but increase frying time to 8-10 minutes per side. Ensure it reaches 165°F internally. It’s juicier this way—great if you prefer traditional style.
What if my Fried Chicken Breast coating falls off?
Pat the chicken dry and let the breaded pieces rest before frying to help it adhere. Chill for 15 minutes if needed. This simple step saves your Fried Chicken Breast from bare spots.
Final Thoughts
From the first sizzle in the pan to that final crispy bite, this Fried Chicken Breast recipe has become a staple in my home for good reason—it’s reliable, flavorful, and oh-so-satisfying. I hope you give it a try and make it your own with the customizations we discussed. Whip up a batch this week; your taste buds (and family) will love you for it—what are you waiting for?