Stained Glass Cookies Recipe
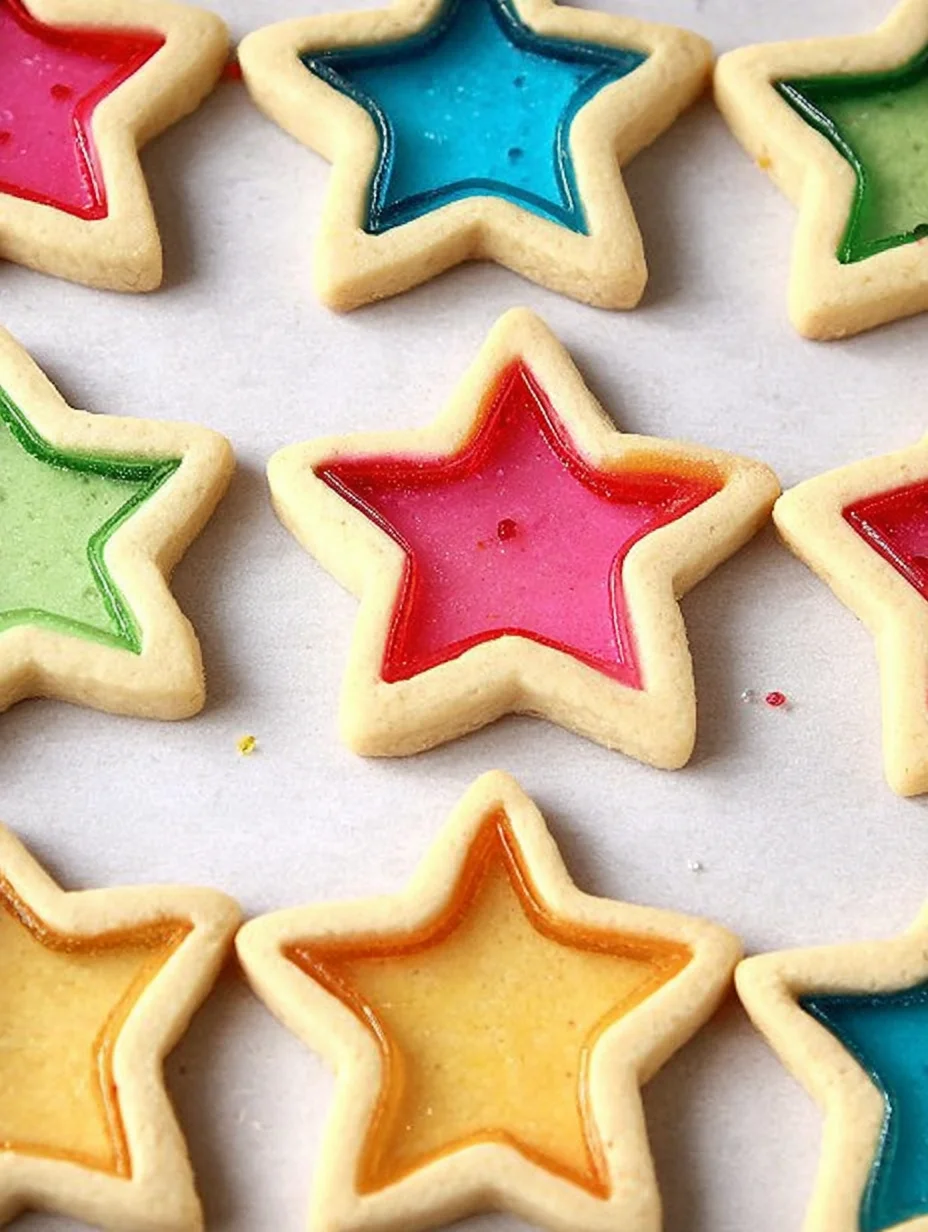
I’ve always been fascinated by cookies that double as edible art, and that’s exactly what these Stained Glass Cookies bring to your kitchen. Picture this: delicate sugar cookie dough shaped into festive forms, with colorful candy centers that melt into a translucent, jewel-like glow—it’s like baking your own windowpane masterpiece. The first time I made Stained Glass Cookies for a holiday party, everyone was mesmerized by their vibrant hues peeking through the golden edges. If you’re looking to impress without too much fuss, this recipe is your ticket to cookie fame.
What I love most about Stained Glass Cookies is how they capture the magic of the season or any celebration, really. They’re not just treats; they’re conversation starters that light up the room. In my experience, kids go wild for them, and adults appreciate the nostalgia of that classic look. Today, I’m thrilled to share my go-to method for creating these stunning Stained Glass Cookies—easy enough for beginners but with pro-level results that will have you reaching for the oven more often.
Key Takeaways:
- Stained Glass Cookies create a stunning visual effect with melted candy centers that mimic colorful glass.
- Prep time is just 20 minutes, with baking taking under 15 minutes per batch for quick results.
- Buttery sugar cookie base pairs perfectly with the sweet, fruity candy for an irresistible flavor burst.
- Chill the dough for at least 30 minutes to ensure clean cuts and prevent spreading.
- Store in an airtight container for up to a week; they make great gifts or party favors.
Why You’ll Adore This Stained Glass Cookies
Visually Stunning Presentation: These Stained Glass Cookies aren’t just delicious—they’re a feast for the eyes with their translucent candy windows in reds, blues, and greens. I remember serving them at a winter gathering, and they became the centerpiece of the dessert table. You’ll love how they add a pop of color to any spread.
Grab This Chef Knife Now - Almost Gone!

- Stays Razor-Sharp: Ice-hardened blade keeps its edge longer than ordinary knives
- Superior Grip Control: Unique finger hole design gives you perfect balance and safety
- Built to Last a Lifetime: Premium stainless steel blade with elegant beech wood handle
- ✓ Finally, a knife that stays sharp and feels comfortable in my hand
- ✓ Professional quality without the premium price tag
- ✓ Makes meal prep faster and more enjoyable
⏰ Only a few items left in stock - order soon
Simple Yet Impressive Technique: Don’t let the fancy look fool you; making Stained Glass Cookies is straightforward with basic ingredients you likely have on hand. It’s that perfect balance of ease and wow-factor that keeps me coming back to this recipe. Here’s the thing: anyone can master it with a little patience.
Customizable for Any Occasion: Tailor your Stained Glass Cookies to holidays by choosing themed candies—think hearts for Valentine’s or pumpkins for fall. The versatility means they’re always relevant and fun. Plus, the buttery dough ensures they taste as good as they look every time.
Family-Friendly Fun: Involving kids in assembling Stained Glass Cookies turns baking into a joyful activity. Watching the candy melt is like science class meets dessert hour—pure magic. It’s a recipe that builds memories along with skills.
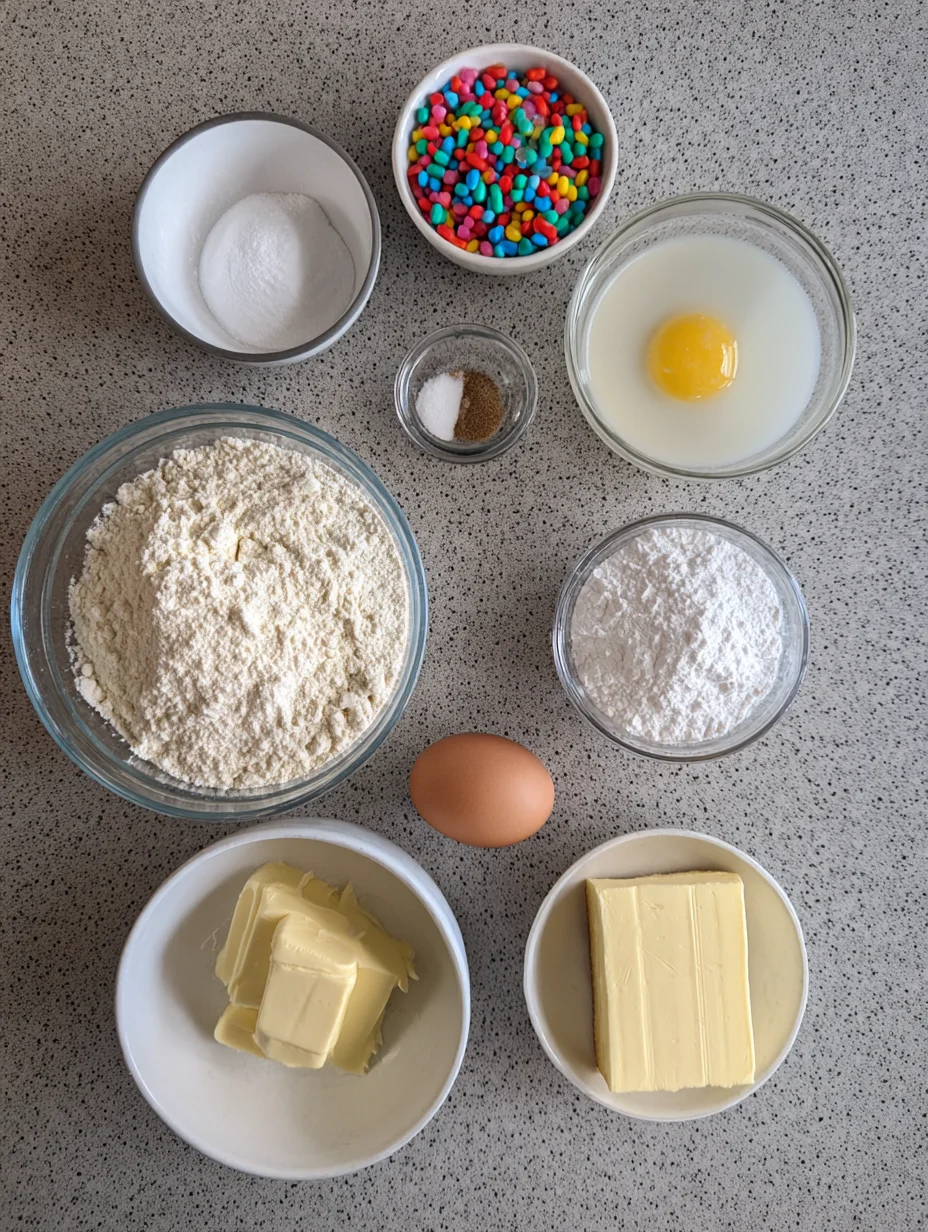
Essential Ingredients for Stained Glass Cookies
All-Purpose Flour: The backbone of your cookie dough, all-purpose flour provides the structure needed for these Stained Glass Cookies to hold their shape during baking. I always sift mine to avoid lumps, ensuring a tender crumb that contrasts beautifully with the hard candy centers. Without it, the dough would be too sticky, ruining that perfect outline. In total, you’ll use about 2 cups to yield around 24 cookies.
Unsalted Butter: Softened to room temperature, unsalted butter creams with sugar for a rich, melt-in-your-mouth texture in your Stained Glass Cookies. It adds that essential flavor depth without overwhelming the candy’s vibrancy. I’ve found using high-quality butter makes a noticeable difference in taste—worth the splurge for special bakes.
Hard Candies (like Jolly Ranchers): These are the stars, crushed into colorful bits that melt into stained glass effects for your Stained Glass Cookies. Choose a variety of flavors and colors to create patterns that dazzle. Be sure to crush them finely to avoid uneven melting; it’s what gives these treats their signature look and subtle fruity notes.
How to Make Stained Glass Cookies
Prepare the Dough
Start by creaming together softened butter and sugar in a large bowl until light and fluffy—this takes about 2 minutes with an electric mixer. Beat in the egg and vanilla extract until fully incorporated, then gradually mix in the flour and salt to form a soft dough. For Stained Glass Cookies, wrap it in plastic and chill for 30 minutes; this step is crucial as it firms up the dough, making it easier to roll and cut without sticking. I like to add a pinch of almond extract for extra depth, but that’s optional.
Roll and Cut Shapes
Once chilled, roll the dough to 1/4-inch thickness on a lightly floured surface, feeling the cool dough yield under your rolling pin. Use cookie cutters to stamp out your desired shapes—stars or hearts work beautifully for Stained Glass Cookies—and place them on a parchment-lined baking sheet. Now, cut out smaller shapes in the centers of half the cookies to create windows; bake these frames separately if needed. The scent of vanilla wafting through the kitchen at this point always gets me excited for what’s next.
Fill and Bake
Sprinkle crushed hard candies into the cut-out centers, ensuring even coverage without overflowing, which could cause spills during baking. For perfect Stained Glass Cookies, use about 1/2 teaspoon per window and bake at 350°F for 8-10 minutes until the edges are golden and the candy has fully melted into a glossy sheen. Let them cool completely on the sheet to harden the centers—rushing this leads to sticky disasters. Watch closely; overbaking dulls the vibrant colors that make these so special.
Ingredients
- 1/2 cup unsalted butter, softened
- 1/2 cup granulated sugar
- 1 large egg
- 1 teaspoon vanilla extract
- 1 1/2 cups all-purpose flour
- 1/4 teaspoon salt
- 20-24 hard candies, crushed (assorted colors and flavors)
Yields: About 24 cookies | Prep Time: 20 minutes | Chill Time: 30 minutes | Bake Time: 10 minutes
Stained Glass Cookies Instructions
- Cream butter and sugar until fluffy. Add egg and vanilla; mix well.
- Incorporate flour and salt to form dough. Chill for 30 minutes.
- Roll dough to 1/4-inch thick. Cut shapes and inner windows.
- Fill windows with crushed candy. Bake at 350°F for 8-10 minutes.
- Cool completely before handling.

Pro Tips for the Best Stained Glass Cookies
Chill Thoroughly: Always chill your dough; it prevents spreading and ensures crisp edges around your Stained Glass Cookies.
Crush Candies Finely: Use a food processor for uniform pieces—uneven candy leads to bumpy centers in Stained Glass Cookies.
Grab This Kitchen Scale Now — Best Precision Pick!

- Razor-Accurate Every Time: Dual-increment precision down to 0.1g — perfect for baking, meal prep, and portion control with g, oz, ml, and fl'oz modes.
- Smart Removable Bowl Design: Detachable bowl doubles as a protective case for compact storage. Tare function lets you weigh ingredients in any container with zero fuss.
- Built for Everyday Convenience: Auto-zero, tare function, low battery alert, overload indicator, and 2-minute auto-off to extend battery life — all in a sleek stainless steel build.
- ✓ "Perfect for baking — precise, lightweight, and stores easily without wasting counter space"
- ✓ "A game changer! Weighing ingredients is now way more accurate than measuring cups"
- ✓ "Love the 0.1g precision and backlight — best food scale I've owned. Highly recommend!"
⏰ Only a few items left in stock - order soon
Bake on Parchment: Line your sheets to avoid sticking and make cleanup a breeze for these beautiful Stained Glass Cookies.
You Must Know
- Stained Glass Cookies require cooling time to set the candy; don’t rush removal from the pan.
- These cookies are best enjoyed at room temperature for optimal crunch and shine.
- Avoid humid environments when baking, as moisture can affect the candy’s hardening.
- Hard candies melt best; avoid chocolate or soft types for true stained glass effect.
How to Store Stained Glass Cookies
To keep your Stained Glass Cookies fresh, store them in an airtight container at room temperature for up to one week—the candy centers stay glossy without softening. For longer storage, layer them with parchment paper in the fridge for up to two weeks, though the colors might slightly dull over time. If freezing, wrap individually and thaw at room temp; they freeze well for a month. Just remember, Stained Glass Cookies taste best within days of baking.
Customizing Your Stained Glass Cookies
Experiment with dough flavors by adding lemon zest for a citrus twist or cocoa powder for chocolate Stained Glass Cookies that nod to festive themes. If you’re gluten-free, swap in a 1:1 flour blend—I’ve had great success with it in similar bakes. For vegan versions, use plant-based butter and a flax egg substitute. Check out our lemon blueberry cookies recipe for more citrus inspiration when varying your Stained Glass Cookies.
What to Serve with Stained Glass Cookies
Pair these colorful treats with a hot cup of herbal tea or spiced cider to enhance their fruity notes—it’s a cozy match. For a dessert spread, arrange alongside fresh fruit like berries or citrus slices to echo the vibrant colors. If hosting, serve with vanilla ice cream for a fun contrast in textures. Don’t overlook a simple cheese board; the sweetness of Stained Glass Cookies balances salty crackers and mild cheddars beautifully.

Stained Glass Cookies Recipe
These stained glass cookies are so pretty and they're REALLY EASY to make. Impress your guests with these beautiful AND tasty sugar cookies!
Timing
Recipe Details
Ingredients
- 01 1 cup Sugar
- 02 1/2 teaspoon Salt
- 03 1 Tablespoon Vanilla extract
- 04 1 Egg (large)
- 05 3/4 cup Butter (room temperature)
- 06 2-1/2 cups Flour
- 07 16 Jolly Ranchers
Instructions
Gather your cookie ingredients and supplies.
Add the sugar, salt, vanilla, egg, and room temperature butter to a mixing bowl.
Combine the ingredients in a stand mixer or with a hand mixer.
Add the all purpose flour and mix until the dough starts to clump together.
Transfer the dough to your working surface and knead briefly.
Cover your dough with plastic wrap and chill in the refrigerator for 1 hour.
Unwrap two jolly ranchers and place them in a plastic baggie.
Use a hammer or meat mallet to crush the jolly ranchers into very small pieces. Powder is okay as well, but try and get rid of any large chunks.Repeat with other jolly rancher colours. Two jolly ranchers will fill 3 - 4 cookies, depending on your cut out size.
Add flour to your working surface. Place the dough on top and add a bit more flour on top of the dough.
Roll out the dough until it's just over 1/4 inch thick.
Use a cookie cutter to cut out star shapes, or whatever shape you'd like!
Place the cookies on a parchment lined baking tray.You can also use a silicone mat, but you need to cover your baking sheet with something to stop the candy from sticking.
Cut out the centers of the cookies with a smaller cookie cutter of a similar shape.
Fill the center of the cookies with the crushed candies. Make sure they don't overflow; just add enough to cover the hole.Try and remove any pieces that fall on the top of the cookies prior to baking.
Preheat your oven to 350F and bake the cookies for 12 minutes.Allow the cookies to cool on the tray for 20 - 30 minutes, until the candy center has hardened.
Your stained glass cookies are complete!
FILED UNDER:
NUTRITION FACTS (PER SERVING)
Nutrition information is calculated using an ingredient database and should be considered an estimate. In cases where multiple ingredient alternatives are given, the first listed is calculated for nutrition. Garnishes and optional ingredients are not included.
Frequently Asked Questions About Stained Glass Cookies
Can I make Stained Glass Cookies ahead of time?
Absolutely, you can prepare the dough and even cut out shapes a day in advance, then chill until ready to bake. The candy filling is best added just before baking to prevent sticking. This make-ahead approach is perfect for holiday rushes.
How long does Stained Glass Cookies last in the fridge?
Stained Glass Cookies stay fresh in the fridge for up to two weeks in an airtight container. The candy might get slightly tacky, so room temperature is preferable for serving. For best flavor, enjoy within a week.
Can I use store-bought dough for Stained Glass Cookies?
Yes, store-bought sugar cookie dough works in a pinch, but homemade gives better control over thickness for those perfect windows. Just ensure it’s chilled well to mimic the recipe’s results. I’ve tried it both ways—homemade wins for taste.
What if my candy doesn’t melt evenly in Stained Glass Cookies?
Uneven melting often comes from large candy pieces; crush finer next time for smooth results in your Stained Glass Cookies. Baking a minute longer can help, but watch to avoid burning. Patience during cooling also ensures even hardening.
Are Stained Glass Cookies gluten-free?
Not by default, but you can easily make them gluten-free with a suitable flour swap. Test a small batch first to adjust texture.
How do I prevent Stained Glass Cookies from sticking to the pan?
Always use parchment paper or a silicone mat under your Stained Glass Cookies—this combo guarantees easy release once cooled. Greasing alone isn’t enough for the melted candy. In my experience, this tip saves many a batch.
Can kids help make Stained Glass Cookies?
Definitely; supervising the candy crushing and filling keeps it safe and fun for little ones. It’s a great way to teach baking basics.
What’s the best candy for Stained Glass Cookies?
Jolly Ranchers or Life Savers are top choices for their quick melt and bold colors in Stained Glass Cookies. Avoid gummies—they won’t create the glass effect. Experiment with flavors for variety.
Final Thoughts
From the first roll of dough to admiring those glowing centers, making Stained Glass Cookies has brought so much joy to my baking adventures—and I know it will for you too. They’re more than a recipe; they’re a way to infuse creativity into everyday treats. Give this a try this weekend, and don’t forget to share your colorful creations with friends. Your table deserves these beautiful Stained Glass Cookies!